
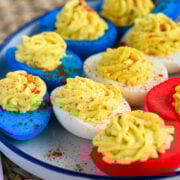
Learn how to make easy Red, White, and Blue Deviled Eggs for your 4th of July-the perfect addition to any Fourth of July, Memorial Day, or patriotic celebration. The dyed egg whites make them a festive and fun appetizer or side dish.

Why This Recipe is the Best
These 4th of July Deviled Eggs are the ultimate patriotic party appetizer-bright, creamy, and so much fun to make! We took classic deviled eggs and gave them a red, white, and blue twist to match the festive spirit of Independence Day. The vibrant colors instantly add flair to any holiday spread, while the smooth, tangy filling keeps everyone coming back for more.
We especially love how easy they are to prepare with just a few basic ingredients and some food coloring. Our step-by-step method makes dyeing the egg whites simple (and a great project to do with kids!). Whether you're hosting a backyard BBQ, picnic, or fireworks party, these deviled eggs are a guaranteed hit that brings both flavor and fun to the table.
Try our original Deviled Egg recipe inspired by Paula Deen. For more festive ideas, try our Easter Deviled Eggs, Thanksgiving Deviled Eggs, Christmas Deviled Eggs, and even Halloween Deviled Eggs.
Jump to:
Key Ingredients
Made with tasty hard-boiled eggs and a combination of spices to make a creamy center.

- Eggs- Hard-boil eggs for 12 minutes to ensure the centers set. Cool them in an ice bath for 10 minutes for easy peeling.
- Mustard- For this recipe, we use yellow mustard. If you want a different flavor, try Dijon or stone-ground mustard.
- Relish- If your relish or sweet relish has large chunks, blend it in the blender before adding it to your yolk mixture.
- Spices- Flavor the deviled egg filling with salt, pepper, and smoked paprika.
- Food Coloring- To get those cute red and blue eggs, use red and blue food dye. Gel dye will give you a stronger color.
See recipe card for quantities.
How to make 4th of July Deviled Eggs
Learn how make Independence Day Deviled Eggs with these easy to follow, step by step process photos.

- Once the hard-boiled eggs are boiled, cooled, and peeled, cut the eggs in half and remove the yolks.
- Add the yolks, mayo, relish, salt, and pepper to a food processor. Blend until smooth.

- Dye the egg whites. See section below for full instructions.
- Pipe the filling into the center of the dyed eggs. Serve immediately, or refrigerate until ready to serve.
Hint: Gel food dye will result in a darker, more vibrant color than liquid dye. The longer the egg whites are in the dye, the darker they will become, so be sure to keep an eye on them until they are the color you want.

How To Dye Boiled Egg Whites
To dye the eggs, mix 1 cup of vinegar with red or blue food coloring in separate bowls. Soak 4 egg whites in each color for about 5 minutes or until the desired shade is reached. Let them dry on paper towels, either air drying or gently blotting-wiping may remove some dye.
Common Mistakes
Before you dye your eggs, we suggest you wipe them clean and free from any extra shell or membrane that may be on the eggs. If they aren't clean, the dye will have a hard time changing the color of the eggs. Once those extra pieces fall off, they will leave unwanted white spots on the egg.
We found that chilling the eggs before serving gives them the best flavor and texture.

Top tip
Make sure the eggs are evenly spaced from one another. If the dyed eggs touch the other eggs, they will dye them a different color than they are.
Related
Looking for other recipes like this? Try these:


Recipe

4th of July Deviled Eggs
Ingredients
- 14 eggs
- ½ cup mayo or Greek yogurt, see note 1 below
- 1 Tablespoon sweet relish see note 2 for a tip
- 2 ½ teaspoons yellow mustard or brown
- salt and pepper to taste, I generally start with a generous ¼ teaspoon each
- paprika to garnish, if desired
- red and blue food coloring
Instructions
Boil the Eggs:
- Place eggs in large pot and cover with water and ½ teaspoon baking soda (can help the eggs peel more easily). Bring to a boil then remove from heat, cover and allow to rest for 12 minutes. Immediately place eggs in an ice bath to cool for 10+ minutes. Peel eggs and cut in half lenghtwise.


Make the Deviled Egg Filling
- Place 2 whole eggs and the remaining 12 egg yolks in the bowl of a food processor. Add the mayo, relish, mustard, salt and pepper to the bowl. Process on high until smooth, scraping down the sides after the first 10 seconds.


Dye Remaining Egg Whites: (see notes 3 and 4 for more tips)
- You can use easter egg dye or food coloing you already have on hand for this. To use food coloring (gel or liquid) place 1 cup vinegar in 2 wide cups or narrow bowls. Place a heaping teaspoon of red food coloring in 1 bowl and a heaping teaspoon of blue in the other. Mix to combine then add 4 whole egg whites (8 halves) to each bowl. You'll have 4 remaining whole eggs that are white. If will probably take 2 or more rounds to dye them all. Let sit for 5 minutes or until desired color is achieved (longer will be darker). Line a plate with some paper towels and place on the towels to dry without letting the eggs touch each other. Either let them air dry or gently blot them dry with a paper towel. If you wipe, you'll wipe some of the dye off.
- Fill the dried and dyed egg whites with the deviled egg filling and serve and enjoy! Feel free to arrange these into a flag shape or add star sprinkles to make them more festive.

Notes
- We love the tang that plain Greek yogurt adds to deviled eggs! Substitute ⅓-2/3 of the mayo for the yogurt. Just don't use only Greek yogurt or it can give it a weird texture and it won't be as creamy.
- We recommend if your relish has big chunks to run it through the blender before adding it to the egg mixture, or it will end up clogging your pastry bag when you're trying to fill the eggs!
- Before dyeing the eggs, we recommend wiping them down or rinsing them off. The little bits of remaining membrane will come off after you dye them and leave white spots.
- You may want to stir your egg whites around while dying them to prevent any white spots or spots where the color isn't as strong.
- Be careful not to let the dyed eggs touch other eggs of a different color or the color will leach onto the other egg!
Nutrition
Substitutions and Variations
Try some of our favorite substitutions and variations for different fun flavors!
- Spicy Version - Add a dash of hot sauce or sprinkle with paprika and cayenne.
- Bacon & Chive - Mix in crispy bacon bits and fresh chives for extra flavor.
- Greek Yogurt Swap - Use Greek yogurt instead of mayo for a tangy taste.
Storage
Once the eggs are assembled, refrigerate in a single layer in an airtight container for up to 2 days. You can make them ahead of time, and they still taste great.
For the freshest look, make the filling ahead and store it separately, then fill the eggs just before serving.
Andrea says
Such a fun way to be even more festive during the 4th of July! And this recipe is so easy.