
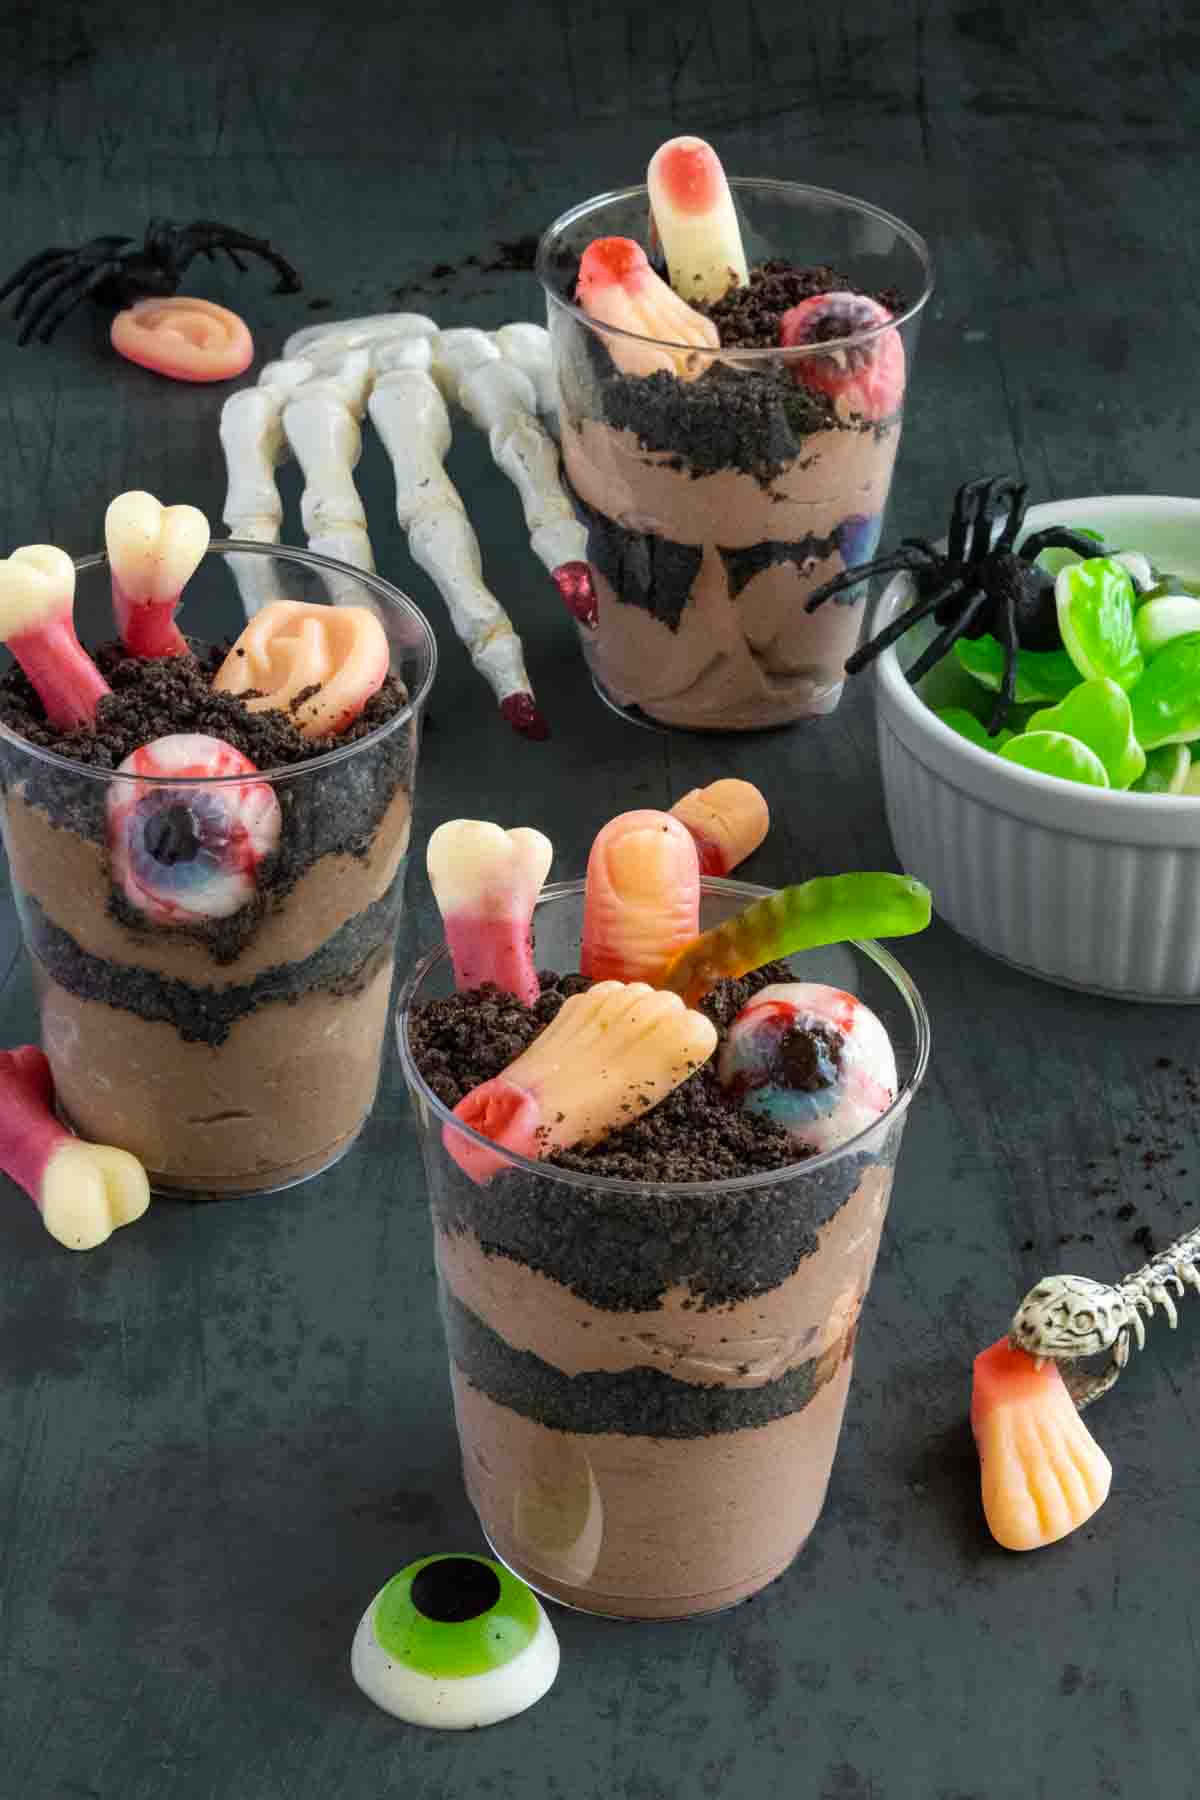
Spooky Halloween Dirt Cups recipe is the perfect easy dessert made with Jello pudding and tasty crushed Oreos. Make a pumpkin patch or graveyard for the best Halloween treat your kids will love!

Why This Recipe is the Best
These Halloween Dirty Cups are the ultimate fun and spooky treat for kids! Made with pudding, crushed cookies, and creepy-crawly toppings, they're a guaranteed hit at any classroom party or Halloween bash. We love how easy they are to prep ahead of time, and kids can even help make them! Whether you add gummy worms, candy pumpkins, or festive sprinkles, they're totally customizable and always a crowd-pleaser. Move over, Pioneer Woman-these are a Halloween must-make!
Make this spooktacular dessert with our Halloween cookies, Halloween rice krispies, and Halloween strawberries for the best Halloween party spread.
Jump to:
Key Ingredients
Depending on what scene you want to make will determine which ingredients you get. Have monster fun with these eerie pudding cups to make for a fun treat.

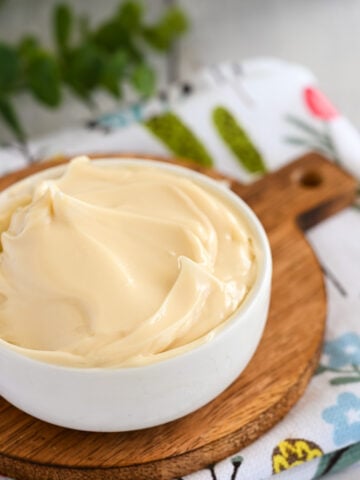
- Pudding- For this recipe, we used chocolate fudge instant pudding mix. It gives a great dirt look but tastes amazing. Feel free to use your favorite type of pudding if you want a different flavor.
- Whipped topping- Cool Whip works great for this recipe. You will want to make sure it's thawed before using. One of the times I was testing this recipe, my Cool Whip wasn't all the way thawed, and I ended up with goopy pudding instead of fluffy pudding because I over-stirred it trying to get the Cool Whip to melt.
- Chocolate cookies- Our favorite cookie to use is Oreos. They are easy to work with and taste delicious.
- Gummies- Have fun with this part. We found fun gummy body parts, and used Milano cookies for gravestones. Use Brach's pumpkins for a pumpkin patch.
How to Make Halloween Dirt Cups
Use these step-by-step process photos to get a better idea of what each step is supposed to look like. Use the photos as a guide for texture and presentation.

- In a large bowl, combine the pudding powder and the milk. Stir until a pudding forms.

- Fold in the thawed whipped cream with the pudding mixture. Mix until smooth.

- Crush chocolate sandwich cookies and set aside. Add pudding mixture to the bottom of a see-through cup. Add a layer of crushed cookies. Repeat for 2 layers.

- Add the body part gummies, or the pumpkins and Milanos, to make a graveyard or pumpkin patch scene.
Hint: If you are making a monster dirt cup. Use vanilla pudding and add food dye to make purple and green. Add crushed Oreos on top for hair. Use a Sharpie on the cups to make cute monster faces.
Helpful Hints
Make monster cups instead of the pumpkin patch and graveyard. Use vanilla pudding and use food dye to turn it purple or green. Draw faces on the cup. The crushed Oreo will act as the hair. Make a Dracula or Frankenstein.
For a spooky Graveyard scene, make these cups with scary eyes and creepy body part gummies. Use a Milano cookie to make a gravestone.
Pumpkin Patch dirt cups are so cute. They make a really fun, festive scene without being too spooky. Use candy corn pumpkins for the pumpkin patch.
Top tip
Make sure to get all the clumps out when mixing the pudding powder and the milk. You want the base mixture to be as smooth as possible.
Recipe

Halloween Dirt Cups
Ingredients
- 3.9 ounce chocolate fudge pudding mix or your favorite chocolate flavor
- 2 cups milk cold
- 8 ounce frozen whipped topping thawed, such as Cool Whip
- 12 chocolate cookies such as OREOs
- gummy body parts, milano cookies, etc for decorations. see notes for ideas
Instructions
- Pour milk into a mixing bowl. Sprinkle pudding mixture on top and whisk to combine. Make sure to mix well to get rid of all lumps! Add in the Cool Whip using a folding motion and stop mixing as soon as well combined. Crush OREOs in a food processor to desired consistency (we like a rough chop for dirt cups).

- Fill cup ⅓ full of pudding mixture then top with a layer of OREOs. You want the OREO layer to be thick enough to show up on the outside of the cup. See photos above. Top with another layer of pudding, then OREOS. Decorate with missing body part gummies or see our notes for other fun ideas like graveyard or monsters.

Video
Notes
- This recipe makes 4-6 Halloween Dirt Cups, depending on size of cup used.
- To make Monster dirt cups, use vanilla pudding. Dye ⅓ green, ⅓ purple and ⅓ orange. Fill cups ¾ full of pudding, then top with OREOs. Draw a corresponding face on each cup, Frankenstein, Dracula and a pumpkin (see photos above). For Dracula, when filling the cup, at the top, have it come to a V on on side of the cup for his widows peak (see picture above) and fill it in with OREOs.
- To Make graveyard dirt cups: Make as directed above, then: Get Pepperidge Farm milano cookies and cake writing gel. Write RIP on the cookies and stick them in the "dirt". Use candy pumpkins and skeletons to decorate. You may also use Peep ghosts.
- To make Pumpkin Patch dirt cups: Make as directed above, then decorate with candy pumpkins, and green tart and tinies for grass. OR: use coconut flakes dyed green. Include gummy worms, if desired and leaf sprinkles.
- Store leftovers in the refrigerator for 1-2 days. The OREOs will likely get a little mushy.
- For make ahead, we highly recommend just crushing the cookies and making the pudding and waiting for the last minute to assemble so that the cookies are nice and crunchy.
- We do not recommend freezing this recipe.
Nutrition
You can even pair it with our Halloween Charcuterie Board and our Halloween Bark. Your kids will love the addition.
Don't forget to try our original Dirt Cups.
Substitutions and Variations
- Dairy Free- To make this a dairy-free dessert, use dairy-free pudding and a milk alternative. You still get that smooth, tasty texture and flavor with a dairy-free substitute. Use coconut whipped cream to mix in.
- Gluten Free- Making this gluten free is simple! All you need is gluten-free chocolate cookies. They make gluten-free Oreos that work great for this recipe.
- Sugar Free- Making this 100% sugar free is a little tricky. Use a sugar-free pudding and a sugar-free whipped topping for the base. Use low-sugar or sugar-free cookies and candies to go on top.
- Vanilla Pudding- If you aren't a chocolate fan or want to make different colors, use vanilla. Add food dye to make fun Halloween colors for the base.
- Chocolate Sandwich Cookies- You can use any brand of cookie. You can even use tan cookies to get a sand look. Graham crackers work great for this.
How To Serve Dirt Cups for Halloween
Serve for any Halloween party. Both kids and adults will love these ghoulish desserts. Make it a fun spread by serving it with other fun Halloween Treats like our Halloween cookies, Halloween rice krispies, and Halloween strawberries. You may also love making these fun Black Cat Cookies.
Storage
Store assembled cups for 1-2 days. The cookie topping and gummies don't do well in the refrigerator for extended periods of time and may begin to look weird. If making ahead of time, store in the refrigerator. Cover gently with plastic if possible to help with freshness. We also recommend making the pudding ahead and assemblingit as late as possible before serving.
This recipe does not freeze well.


Andrea says
Wow these spooky Halloween dirt cups were so easy to make and are so adorable. I made the pumpkin patch scene but totally doing the graveyard next time.
Janae says
Such a cute idea! My kiddos desperately want to start all the fall activities and now that our family carpet cleaning business is slowing down, and we finally have the time. Saving this because I have no doubt it will be amazing!! <3